整合后端
(一)导出配置
我要把这个工作流加入到我现有的 MVP 中了,在此之前,我是否可以导出 Keycloak 的配置文件,这样我可以更方便地 vibe coding?
可以,而且 Keycloak 官方就支持:
- ✅ 导出 Realm 全量配置
- ✅ 只导出 某个 Client(如 ordinis-focus-web)
- ✅ 包含 / 不包含用户、密钥、角色都可控
- ✅ 可导出为 JSON(非常适合 version control + vibe coding)
1. 导出 整个 Realm
如果你是 Keycloak ≥ 17(Quarkus 版):
/opt/keycloak/bin/kc.sh export \
  --realm Ordinis \
  --dir /tmp/keycloak-export \
  --users=skip
导出结果类似:
/tmp/keycloak-export/
└── Ordinis-realm.json
这个 Ordinis-realm.json 就是你完整的身份系统配置快照。
有了导出文件,就可以秒级重建环境, “一条命令还原整个身份系统”。
kc.sh import --file Ordinis-realm.json
如果是 docker 部署,则首先进入 Keycloak 容器
docker exec -it keycloak bash
进入后你会在类似:
/opt/keycloak
执行导出命令(⚠️关键)
/opt/keycloak/bin/kc.sh export \
  --realm Ordinis \
  --dir /tmp/keycloak-export \
  --users=skip
| 参数 | 含义 |
|---|---|
--realm Ordinis | 只导出你的 Realm(不会动 master) |
--dir /tmp/keycloak-export | 输出目录 |
--users=skip | 强烈建议,避免导出真实用户 |
容器内导出结果
ls /tmp/keycloak-export
你会看到类似 Ordinis-realm.json,这就是你完整的身份系统配置快照。
在宿主机执行:
docker cp keycloak:/tmp/keycloak-export/Ordinis-realm.json \
  ~/keycloak/Ordinis-realm.json
现在你就可以:
cat ~/keycloak/Ordinis-realm.json
2. 导出某一个 Client
有两种方式:
方式 A(推荐):导出整个 Realm,再“只改 Client 部分”
Keycloak 的 Realm JSON 里本来就是结构化的:
{
  "realm": "Ordinis",
  "clients": [
    {
      "clientId": "ordinis-focus-web",
      "protocol": "openid-connect",
      ...
    }
  ]
}
👉 你完全可以:
- 保留整个 realm JSON
- 只重点维护
ordinis-focus-web这个 client - 其他 client 不动 / 删掉 / 注释说明
这是最稳的方式,因为 client 和 realm 不是完全独立的(比如 realm-level settings)。
方式 B(API 方式,偏高级)
Keycloak Admin REST API 支持导出 client,但:
- 需要 admin token
- 不如 realm export 稳定直观
- 不建议 MVP 阶段折腾
注意:
- 导出的 JSON 默认会包含:
"secret": "mAbFlGgIKg85..."
不要把 clientSecret 长期明文提交
- 不要导出用户(除非你明确知道你在干什么)
--users=skip
否则:
- 会把真实用户 email / id / hash 带出来
- 后期迁移、分享都很麻烦
(二)配置登录页
Keycloak 的主题(Theme)选择默认是以 Realm 为单位生效;
我们接下来的目标是自己定制 登录和注册 页面,无 Keycloak 字样、统一 Oridinis 软件矩阵风格”,并在 Realm 级别启用;如需覆盖注册/找回密码/验证邮箱等所有用户侧页面,也都属于同一个 login 主题范围。
你需要完成 4 件事:
- 在宿主机准备一个
ordinis主题目录(包含模板 + CSS/图片/字体) - 通过
docker compose把主题挂载进 Keycloak 容器/opt/keycloak/themes - 在 Keycloak Admin Console 中对 Realm 设置
Login Theme = ordinis(全矩阵统一)(Keycloak) - 开发期关闭主题缓存(可选,但强烈建议),便于你反复改 CSS/FTL 立即见效(无需每次重建镜像)
主题作用域:你要的“整个软件矩阵统一一套�登录页”
步骤一:创建主题目录
在宿主机的 ~/keycloak 下新建创建主题目录:
mkdir -p ~/keycloak/themes/ordinis/login/resources/{css,img,fonts,js}
关键文件结构如下(先按最小集创建,后面逐步覆盖更多页面):
~/keycloak/themes/ordinis/
└── login/
    ├── theme.properties
    ├── login.ftl
    ├── register.ftl
    ├── template.ftl
    └── resources/
        ├── css/
        │   └── styles.css
        └── img/
            └── logo.svg
说明:
login.ftl/register.ftl/template.ftl覆盖“登录/注册/整体框架”。后续你再按需覆盖忘记密码、重置密码、验证码等页面模板即可。
步骤二:拷贝模板
不要从零写 FTL。直接从容器里把默认主题拷贝出来改(能保证变量/宏不踩坑):
进容器看默认主题路径(Keycloak 26 通常有 keycloak 和 keycloak.v2 等):
docker exec -it keycloak bash
ls /opt/keycloak/themes
显示只有README 文件,内容如下
Creating Themes
===============

Themes are used to configure the look and feel of login pages and the account management console.

Custom themes packaged in a JAR file should be deployed to the `${kc.home.dir}/providers` directory. After that, run
the `build` command to install them before starting the server.

You are also able to create your custom themes in this directory, directly. Themes within this directory do not require
the `build` command to be installed.

When running the server in development mode using `start-dev`, themes are not cached so that you can easily work on them without a need to restart
the server when making changes.

See the theme section in the [Server Developer Guide](https://www.keycloak.org/docs/latest/server_development/#_themes) for more details about how to create custom themes.

Overriding the built-in templates
---------------------------------

While creating custom themes, especially when overriding templates, it may be useful to use the built-in templates as
a reference. These can be found within the theme directory of `../lib/lib/main/org.keycloak.keycloak-themes-26.0.8.jar`, which can be opened using any
standard ZIP archive tool.

**Built-in themes should not be modified directly, instead a custom theme should be created.
以上内容说明,Keycloak 17+(你的是 26.0.8)默认 内置主题不再以目录形式放在 /opt/keycloak/themes/,而是打包在一个 JAR 里
在宿主机执行。在容器里定位内置主题 JAR:
docker exec -it keycloak bash -lc 'ls -l /opt/keycloak/lib/lib/main | grep keycloak-themes'
输出
-rw-rw-r-- 1 keycloak root 16121566 Jan 13 2025 org.keycloak.keycloak-themes-26.0.8.jar
先检查容器有没有 unzip
docker exec -it keycloak bash -lc 'command -v unzip || echo "no-unzip"'
输出显示 no-unzip,说明容器没有 unzip,用宿主机 Python 解包
先把 themes JAR 拷到宿主机
docker cp keycloak:/opt/keycloak/lib/lib/main/org.keycloak.keycloak-themes-26.0.8.jar \
  ~/keycloak/keycloak-themes-26.0.8.jar
用 Python 列出里面的 theme 目录
python3 - <<'PY'
import zipfile, re
jar_path = "/home/ubuntu/keycloak/keycloak-themes-26.0.8.jar"
with zipfile.ZipFile(jar_path) as z:
    names = z.namelist()
themes = sorted({n.split('/')[1] for n in names if n.startswith('theme/') and len(n.split('/'))>2})
print("themes:", themes)
for n in names[:50]:
    print(n)
PY
再列出 theme/ 下的前 80 个文件:
python3 - <<'PY'
import zipfile
jar_path = "/home/ubuntu/keycloak/keycloak-themes-26.0.8.jar"
with zipfile.ZipFile(jar_path) as z:
    for n in z.namelist():
        if n.startswith("theme/"):
            print(n)
            break
PY
(如果你想只看 login 相关文件,也可以 grep)
解压出 keycloak.v2/login(或 keycloak/login)
python3 - <<'PY'
import zipfile, os
jar_path = "/home/ubuntu/keycloak/keycloak-themes-26.0.8.jar"
out_dir = "/home/ubuntu/keycloak/themes/ordinis/_upstream_from_jar"
prefix = "theme/keycloak.v2/login/"

with zipfile.ZipFile(jar_path) as z:
    names = [n for n in z.namelist() if n.startswith(prefix)]
    if not names:
        prefix = "theme/keycloak/login/"
        names = [n for n in z.namelist() if n.startswith(prefix)]
    if not names:
        raise SystemExit("No keycloak.v2/login or keycloak/login found in jar.")

    for n in names:
        target = os.path.join(out_dir, n[len("theme/"):])  # drop leading "theme/"
        if n.endswith("/"):
            os.makedirs(target, exist_ok=True)
        else:
            os.makedirs(os.path.dirname(target), exist_ok=True)
            with z.open(n) as src, open(target, "wb") as dst:
                dst.write(src.read())

print("Extracted under:", out_dir)
print("Used prefix:", prefix)
PY
你最终会得到:
~/keycloak/themes/ordinis/_upstream_from_jar/keycloak.v2/login/...
先看一下你解包出来的目录,确认 upstream 文件结构
ls -la ~/keycloak/themes/ordinis/_upstream_from_jar/keycloak.v2/login | head -n 30
你应该会看到 theme.properties、template.ftl、login.ftl、resources/ 等。
为了“完全定制 + 去 Keycloak 字样”,建议先复制这三类:
- 框架:
template.ftl - 登录:
login.ftl - 注册:
register.ftl(如果 upstream 没有,就从相关模板补) - 静态资源:
resources/(至少保留基础 css/js,再用你自己的覆盖)
先复制最关键的:
cp -a ~/keycloak/themes/ordinis/_upstream_from_jar/keycloak.v2/login/* \
      ~/keycloak/themes/ordinis/login/
然后你会得到:
ls -la ~/keycloak/themes/ordinis/login | head -n 30
步骤三: 修改 theme.properties
打开:
vim ~/keycloak/themes/ordinis/login/theme.properties
建议你把它改成(最稳):
parent=keycloak.v2
styles=css/styles.css
然后创建你自己的 CSS 文件:
cat > ~/keycloak/themes/ordinis/login/resources/css/styles.css <<'CSS'
/* Oridinis Theme - overrides */

:root {
  --ordinis-bg: #0b0f19;
  --ordinis-card: rgba(255,255,255,0.06);
  --ordinis-text: rgba(255,255,255,0.92);
  --ordinis-muted: rgba(255,255,255,0.65);
  --ordinis-border: rgba(255,255,255,0.14);
  --ordinis-accent: #5b7cff;
}

body {
  background: var(--ordinis-bg) !important;
  color: var(--ordinis-text) !important;
}

.card-pf, .pf-v5-c-login__container {
  background: var(--ordinis-card) !important;
  border: 1px solid var(--ordinis-border) !important;
  border-radius: 14px !important;
  backdrop-filter: blur(10px);
}

a, .pf-v5-c-button.pf-m-link {
  color: var(--ordinis-accent) !important;
}

.pf-v5-c-button.pf-m-primary {
  background: var(--ordinis-accent) !important;
  border-color: var(--ordinis-accent) !important;
}
CSS
这一步先让你“视觉上像 Oridinis”,后面你再按 UI 细节逐步打磨。
步骤四:替换内容
交给 Windsurf 了
步骤五:把主题挂载到 Keycloak 容器
你的 compose 在 ~/keycloak/docker-compose.yml。
在 keycloak: 服务下增加:
    volumes:
      - ./themes:/opt/keycloak/themes
(开发期先不要 :ro,你改完文件能快速验证;稳定后再加 :ro。)
同时建议开发期关闭主题缓存(否则你改了不生效):
    environment:
      KC_SPI_THEME_CACHE_THEMES: "false"
      KC_SPI_THEME_CACHE_TEMPLATES: "false"
改完后重启 Keycloak:
cd ~/keycloak
docker compose up -d
docker compose restart keycloak
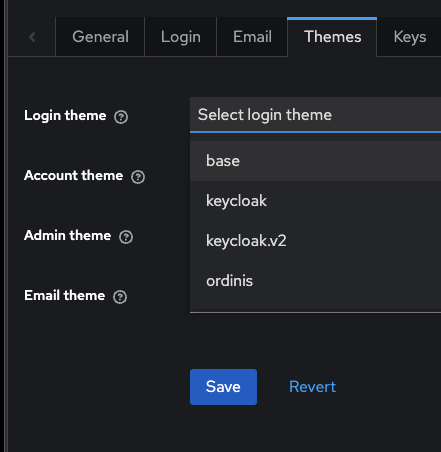
步骤六:在 Keycloak 管理台启用
进入 Admin Console → 选择 realm Ordinis → Realm settings → Themes:
- Login Theme:选择
ordinis - 保存
然后打开一个无痕窗口访问:
https://auth.ordinis.dev/realms/Ordinis/account/- 或你应用触发登录页
如果有进一步修改,无需“重新挂载”,也无需重启容器。